Growing up in Russia, I studied chess seriously and played in many tournaments. Even after immigrating as a child to the United States, I continued my fervent pursuit of chess success to the extent that I could. But then college came along, and then grad school and working life. I had to dial my chess involvement way down. Nowadays, I typically don’t have time to play in tournaments that last all weekend or even longer, or require travel.
Fortunately, the one-day tournaments at the Boylston Chess Club provide a really good outlet for me to play chess in a competitive setting given my limited free time. And despite the fast time control, these tournaments sometimes offer opportunities to play interesting and creative games.
I would like to share my analysis of one such game, which I hope you will find both entertaining and informative. One thing I would like to make clear is that I did not use a computer to aid in my analysis, with one exception I have noted, after my own attempts to make progress in a complicated line had failed.
FM Jacob Chudnovsky (2396)
NM Farzad Abdi (2241)
BCF Legends of Chess (3)
01.30.2016
Ruy Lopez, Berlin Defence [C67]
1. e4 e5 2. Nf3 Nc6 3. Bb5 Nf6 4. 0-0 Nxe4 5. Re1 Nd6 6. Nxe5 Be7 7. Bd3
A relatively rare anti-Berlin line. At the top level, White usually plays 7. Bf1, leading to a quiet game, in which White has a low risk of losing or winning. The line played here aims for immediate confrontation, preparing to attack Black’s castled king. White’s dark-squared bishop will be developed via fianchetto to b2 or a3. The obvious downsides of this variation are that White does not bring his d and c pawns into the center, and that he may experience difficulties with queenside development.
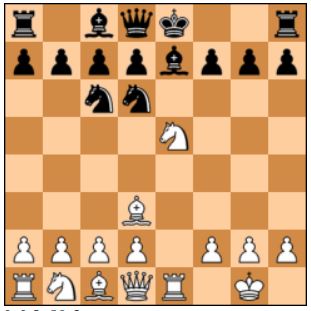
7... 0-0 8. Nc3
Here I wasted a lot of time calculating an attempt to punish Black for his move order – typically 7…Nxe5 is played first – by 8. Qh5 g6 9. Nxg6 hxg6 10. Bxg6 fxg6 11. Qxg6+, but couldn’t find more than a perpetual check for White in the ensuing lines; thus I transposed into the regular line.
8... Nxe5 9. Rxe5 Bf6
Black has other ways to play here too. In a game I played against Jorge Sammour-Hasbun a few years ago, he chose 9…c6 10. b3 Ne8 11. Bb2 d5, and here I should have played 12. Qh5, the point being that 12…g6 is met by 13. Nxd5!! +- (13…cxd5 14. Qxh7+! Kxh7 15. Rh5+ Kg8 16. Rh8#; 13…gxh5 14. Nxe7+ Kg7(h8) 15. Rxh5+ f6 16. Rxh7#; 13…Qxd5 14. Qh6! Q(any) 15. Qxh7+! Kxh7 16. Rh5+ Kg8 17. Rh8#). After 12…Nf6 13. Qh4, White is threatening 14. Rxe7 and 14. Nxd5 and has an active position with many attacking possibilities. To be clear, I did not see this on my own; Jorge showed it to me after the game.
10. Re3 g6
Black needs to complete his development, defend against White’s threat of 11. Bxh7+ Kxh7 12. Qh5+ Kg8 13. Rh3, and find a way to deal with White’s idea of 11. Nd5 attempting to gain the bishop pair. Another game I played went 10…Bd4 11. Rh3 (11. Bxh7+ Kxh7 12. Qh5+ Kg8 13. Rh3 f5 14. d3 does not seem to give enough compensation for the piece) g6 12. Qg4 Qf6 13. Rf3 Qe5 14. Ne2 Bxb2 15. Bxb2 Qxb2 16. Raf1. At the cost of a mere pawn, White has “developed” his Black-squared bishop by getting rid of it and now has a huge lead in development and a direct attack against the Black king. I managed not to win this game, but that’s a statement on my skill level rather than the opening line. 10…Re8 is also possible, but 11. Nd5 is not fully comfortable for Black. 10…g6 should be sufficient for equality.
11. b3
And not 11. Nd5 Bg7 12. Ne7+ Kh8 13. Nxc8 Rxc8, where White would have the bishop pair but be behind in development and still need multiple moves to develop the queen-side.
11... Re8?!
This gets Black in a bit of trouble. It would have been better to complete development and achieve equality by 11…b6 12. Ba3 c5!, as in Shamkovich-Martz, Lone Pine 1975.
12. Ba3!
Here I think my opponent realized that the planned destruction of White’s pawn structure via 12…Rxe3 13. fxe3 Bxc3 14. dxc3 actually lands Black in a nearly lost position. White has the two bishops, a lead in development, and plenty of targets to attack around Black’s king, while White’s pawn weaknesses don’t matter. White will continue (not necessarily in this order) Qd2 or Qf3 as appropriate, Rf1, and, depending on Black’s setup, Bxd6 and Bc4, c4 (and maybe c5) and Bb2, and/or e4 and e5. Black needs to abandon this plan and deal with White’s threat of 13. Bxd6 as well as White’s simple plan of developing the queen (e. g. to f3) and the a1 rook and attacking in the center and on the kingside.
12…Bd4!
A counterstrike that White cannot meet in such a way as to retain all the advantages of his position.
13. Rxe8+
For teaching and learning purposes, I wish this move were worse than it is. It’s against the spirit of the position. White removes the target on d6, helps Black develop the queenside, and makes the bishop on a3 less useful. However, if followed up properly, this move does allow White to keep pressuring Black’s position, and there is not a clearly better alternative. For example, 13. Rf3 or 13. Re2, which would be more thematic, is answered well by 13…Re6! (If 13… Be5 or 13…c5, 14. Nd5! offering an exchange sacrifice is strong. ) Two interesting potential lines, which form a twin set, are: (a) 13. Rf3 Re6 14. Bxd6 Rxd6! (not 14…Bxc3? 15. Bxc7! Qxc7 16. dxc3) 15. Nb5 Bxa1 16. Nxd6 Bf6! = (b) 13. Re2 Re6 14. Bxd6 Bxc3! (not 14…Rxd6? 15. Nb5 Bxa1 16. Nxd6) 15. Bxc7 (15. dxc3 Rxd6 16. Qe1 Re6) Qxc7 16. dxc3 Qxc3 and soon …d5 =. White also has a positional exchange sacrifice, 13. Bxd6!? Bxe3 14. dxe3 cxd6 15. Nd5, where he gets enough compensation, but not more than that; Black will complete development and bother the White knight by 15…b6 and 16…Bb7.
13…Nxe8 14. Nd5?
Unlike the previous move, this is an unquestionable error. This pseudo-active move accomplishes multiple things… for Black. It allows Black to comfortably finish development and shut out the a3 bishop, and throws away White’s advantage. Correct was 14. Qf3. Now 14... d6 and 15... Be6 loses the b7 pawn, 14... d5 15. Re1 simply loses (15... Be6 16. Rxe6 or 15... c6 16. Re7), and 14... Qf6 15. Re1 Ng7 is also highly unlikely to hold. Black hangs on by 14... d6 15. Re1 Nf6, planning ... c6 and ... Be5, followed by developing the c8 bishop. However, White will pile on the pressure, e. g. by Bc4, Nd5 or Ne4, etc.
14... d6 15. c3 Bg7 16. Qe2 Be6 17. Nf4 Bd7 18. Re1 Nf6 19. Bc4 Bc6
After this series of moves, some forced and some simply logical, the position is objectively equal. Here I tried to come up with a way to make something out of nothing, or at least prevent massive liquidation and a dead draw. In fact, White has to be careful not to end up worse. For example, after 20. d4 d5 21. Bb5 Qd7! 22. Bxc6 Qxc6, Black is pressuring the weak c3 pawn, planning 23... Re8, and considering kicking the f4 knight by ... g5 and invading with his own knight to e4. I also considered 20. Qe7 but didn’t see anything for White in the endgame after 20... d5 21. Qxd8+ Rxd8. And it’s a good thing too, as I would have actually lost after 20. Qe7? Qxe7! 21. Rxe7 d5 22. Bf1 Bf8 – this line entirely escaped my field of vision during the game. I looked at 20. Bxf7+ Kxf7 21. Qe6+ (21. Qc4+ d5) Kf8 22. Qc4, but after 22... Bd7 there is no follow-up. I finally settled on a line that exchanges more pieces but leaves a queen and bishop endgame where White can use his slight space advantage to try to reduce Black to passivity or damage Black’s pawn structure.
20. Qd3 Qd7
After 20... d5, an attempt to win a pawn by 21. Be7 ends up losing a piece, albeit for some compensation, after 21... Qe8! 22. Nxd5 (22. Bxd5 Nxd5! 23. Nxd5 Rd8!) Bxd5! 23. Bxd5 Bf8! However, White can play 21. Bb5 with a much better version of the 20. d4 d5 21. Bb5 variation discussed above.
21. Nd5 Nxd5 22. Bxd5 Re8 23. Rxe8+ Qxe8 24. Kf1 h5 25. Qf3
Although not forced, this was roughly the position I was going for. The idea was that 25... Bxd5 26. Qxd5 would force 26... Qc8 and the Black queen is tied to defense of the queenside pawns, although even then it’s not clear how White can make progress. Otherwise, Black has to allow 26. Bxc6, creating multiple weak pawns. However, once again, something important fell outside my field of vision...
25... Bh6! 26. Bxc6 bxc6 27. Qe2
27. d4 leads to 27... Bd2 and 28... Qe1+
27... Qc8!
And suddenly I realized that White has weaknesses subject to attack too, and that Black is not only not worse but may even try for a win here. White obviously can’t allow the Black queen to come to a6, but it’s also ready to jump to f5, from where it will eye d3, c2, or b1, depending on circumstances. The White queen, meanwhile, is tied to defending the d2 pawn. (28... Bxd2 is threatened, for example) And the a3 bishop really needs to find a job. Or at least a hobby.
28. d4 Qf5 29. g3
Making an escape square for the king in preparation for ... Qb1+; 29... Qh3+ 30. Kg1 doesn’t accomplish anything for Black.
29... h4 30. g4
The combination of ... h3 and ... Qb1+ cannot be allowed. For example, if 30. Qe8+? Kg7 31. Qxc6, either 31... h3 or 31... Qb1+ 32. Kg2 Qxa2 33. Qa4 h3+ lands White in major trouble.
30... Qd5
A solid move. 30... Qb1+ 31. Kg2 h3+!? (otherwise Black has simply trapped his own queen on a1-b1) 32. Kxh3 Qg1 gives Black enough compensation for the pawn, but not more. 33. Qf3 Qb1 34. Qe2 Qg1 is one way the game could end.
31. f3 h3
With his last move, Black has saddled White with a permanent weak pawn on h2. Black’s piece activity and White’s newly created weakness more than compensate for Black’s pawn weaknesses on the queenside, and Black is slightly better. However, White has defended against all immediate threats, and with proper play, it’s difficult for either side to make progress. A draw would be the most appropriate result in this position.
32. Bb2
White dreams of bringing the bishop to life by playing c4 and d5. However, after something like 32... Bf4 33. c4 Qe6! the bishop endgame is most likely lost for White (for example, 34. Qxe6 fxe6 35. Kg1 Be3+ 36. Kf1 d5! (now White has two permanent weak pawns) 37. Bc3 Kf7 38. Ba5 Bf4 39. Kg1 Kf6 and Black will break through in the center) and there is no comfortable way to avoid the queen trade. Thus, White would be better off sticking to solid defense, e. g. by 33. Kg1. However, at this point instead of continuing his successful strategy of playing in the center and on the kingside, Black undertakes a misguided foray to the queenside...
32... Qa5?! 33. a4 Qb6?
It wasn’t too late to repent and play
33... Qd5. 34. b4 a5?!

With his own hands and a total lack of respect for royalty, Black has trapped his queen behind a fence of Black and White pawns. By playing one bad move (33... Qb6?), my opponent took his position from a little better to clearly worse. 34... a5 is the logical conclusion to Black’s move sequence, but is also the losing move. As we will shortly see, White breaks through in the center and on the kingside, while Black’s aggression on the queenside is too slow. Black needed to make a prophylactic move like 34... d5, restraining White’s bishop. Despite being the decisive error, however, 34... a5 does not deserve a full question mark. If Black hadn’t planned to play 34... a5, he wouldn’t have played 32... Qa5 and 33... Qb6 either. It was the plan of removing the queen from the center in order to undermine the queenside that was the real culprit.
35. Qe8+ Bf8?!
Much more resilient defense would have been offered by 35... Kg7! It feels scary to put the king on the same diagonal as the opponent’s bishop, but it is not at all simple for White to take advantage of this.
During the game, while considering my thirtyfifth move, my first analysis of 35. Qe8+ Kg7 consisted of “I should be able to somehow open the long diagonal and win here.” After scolding myself for being lazy, I forced myself to calculate as far as 36. d5! cxd5 37. c4+ d4 (37... f6?? 38. Qe7+) 38. Qb5! “and after the exchange of queens, the a-pawn will decide.” However, it’s not that easy. Some interesting variations arise. Let’s take a look:
(a) 38... Qxb5 39. cxb5 axb4 40. a5! +- The a-pawn is unstoppable or 39... Bd2 40. Bxd4+ Kf8 41. bxa5 Bxa5 42. Bf2! And, with 43. Be1 +-, White will force a winning pawn endgame.
(b) 38... axb4 39. a5 Qa7 (39... Qxb5 40. cxb5 transposes to (a) above) 40. g5! +-.
(c) 38... Be3! The most stubborn defense. 39. bxa5 Qa7! follows, and I must confess that here I could not find a win on my own. It looked to me as though, after 40. a6 Kh6, White has nothing better than a draw: 41. Qb7 Qc5 42. Qb5 (not 42. a7?? Qxc4+ 43. Ke1 Qc2 -+) Qa7. However, the computer finds the way for White to make progress. The question to ask is, which of White’s pieces is not actively participating? The answer is both obvious and, at first glance, bonkers. Indeed, it is White’s king that must join the battle! 40. a6 Kh6 (40... Kf8 41. Ke1!! d3 [else 42. Qb7 Qc5 43. a7 +-] 42. Bf6! and by combining threats of mate and promotion with attacking Black’s bishop and looking for a favorable endgame transformation, White will pull apart Black’s defenses, e. g. 42... Bg1 43. c5! Qa8 [43... Bxc5 44. Qb7 Qxb7 45. axb7 Ba7 46. Kd2 and White wins this bishop endgame – I leave it as an exercise to work this out] 44. cxd6 cxd6 45. Qxd3 Bxh2 46. Kf2 +-, or 42... Qa8 43. Qb7 Qe8 44. Qe4 Qxe4 45. fxe4 and 46. Bg5 with another winning bishop endgame) 41. Ke2!! planning 42. Kd3 and 43. Qb7 (the king defends himself, freeing the queen to help promote the pawn). Now, if 41... Bg1 42. Kd3! Qa8 (42... Bxh2 43. Bxd4 Qa8 44. Qb7 +-) 43. Qb7 Qe8 44. Bxd4, and in the queen endgame White’s king will run forward to get away from checks and join and queen and a-pawn, with excellent winning chances. Or 41... Qa8 42. g5+!? Bxg5 (42... Kh5/g7 43. Qb7 Qe8 44. Qe4 +-; 42... Kh7 43. Qd5 Qe8 44. Kd3 +-) 43. Bxd4, and White will combine king protection with pushing the apawn forward, although there is clearly still a lot of play left.
In short, with optimal play, White still ends up on top after 35... Kg7, but this is what Black should have played. 35... Bf8 loses in a more straightforward manner.
36. Bc1!
After being confined to a3 and b2 for most of the game, the bishop roars into action. Or “trumpets,” if you prefer – this piece was originally known as the elephant. White threatens 37. Bh6, and Black has only one defense. But... after that defense, are things really that bad for Black?
36... Kg7 37. Bh6+ Kxh6 38. Qxf8+ Kg5
OK – now what?
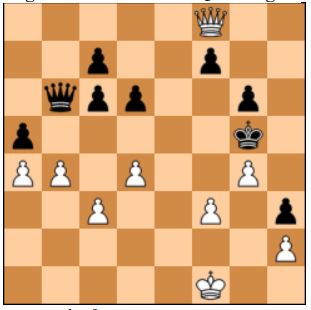
39. Qxf7 axb4 40. Kf2!!
At this point, my opponent first gave me a look that suggested concern for my physical and/or mental health. Then he fell into a deep think. As it turns out, Black’s king is trapped in a mating net, and Black’s queen, whose tragic mistreatment was discussed earlier, is too slow to help on defense. White’s king is going to walk up the board to accept the opposing king’s surrender in person. On a more didactic note, the main thing to take away from this is the concept rather than specific moves. Once you recognize the pattern – a king driven out in front of his pawns, blocked off from behind by the opposing queen and pressured from the front by the opposing king and pawn phalanx – the actual calculations, in this case as in others like it, are not very difficult. For a much more spectacular example of this theme, I refer you to Khismatullin -Eljanov from the 2015 European Championship, which features one of the most beautiful chess moves in recent memory
40... Kh6
Other possibilities were 40... bxc3 41. Kg3 Qxd4 42. f4+ Kh6 43. g5+ Kh5 44. Qh7#, or 40... Qa6 41. Kg3 Kh6 42. f4 Qd3+ (42... g5 43. fxg5+ Kxg5 44. Qg7#) 43. Kh4 + -.
41. f4 g5
Or 41... Qa6 42. Kg3 transposing to the analysis above, or 41... Qb8 42. Kg3 Qh8 43. g5+ Kh5 44. Qe6 + -.
42. f5
And here Black resigned, as there is no defense against 43. Qg6#.
1-0
FM Jacob Chudnovsky has been studying and playing chess since the age of nine. He was one of the top scholastic players in the U.S. in the 90s, with notable results including a tie for first in the 1993 National Junior High School Championships, a tie for 7th -14th in the 1994 World U-14 Championship, winning the 1993 National 9th Grade Championship, and winning the 1996 U.S. Junior Open U-17 Championship. Jacob was ranked second in the U.S. in his age group throughout most of his scholastic playing career. Later he played first board for his college and grad school teams in intercollegiate and open team tournaments. After being mostly on hiatus from serious chess for a number of years, he has resumed chess competition, writing, and teaching over the past year. |