[ Download game file here: RAR ZIP ]
White: Lawyer Times
Black: Denys Shmelov
[A47] Queen’s Indian Defense
1. d4 Nf6 2. Nf3 b6 3. e3 g6
This move order requires a great deal of precision — certainly not the trait Black demonstrates over the next few moves.
4. Bd3 Bb7
4...d6
5. Nbd2 Bg7 6. O-O d6 7. e4 Nbd7?
7... O-O or 7...Nfd7 would have been much better.
8. e5! Nd5 9. e6 fxe6 10. Ng5 Nf8
The originally planned 10...Nf4 leads to disaster after 11. Nde4
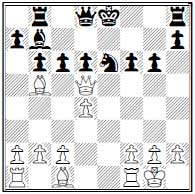
11. Qf3!
Black took it upon himself to avoid theoretical paths at all costs, and he fully succeeded, although at the expense of getting an absolutely lost position.
11.. Bf6
Good time to take a break and count the casualties. Black has avoided immediate catastrophe on e6 or f7, but untangling this position will not be an easy task. Somehow he’ll have to defend his bishop on b7, defend the pawn on e6, and find the good square for his f8 knight and his king. Black’s main hope, however, is that White will get a bit impatient in converting his advantage.
12. Nde4
White is threatening c2-c4, after which the bishop on b7 will be hanging.
12...Rb8
Ugly, but very logical. Black defends his most vulnerable piece.
13. Bb5+
This move allows Black to set up a clever trap.
13... c6 14. Nxf6+
White sees what he thinks is a winning combination, but Black calculates just one move further.
14.. exf6
14... Nxf6 15. Bxc6+ Bxc6 16. Qxc6+ Qd7 allows White to win his pawn back, while maintaining a nice edge.
15. Nxe6 Nxe6 16. Qxd5
So White has won his pawn back, threatening to take a knight or a pawn, and Black has no safe place to hide. Time to call it a night? Not quite.
16...Kd7! 17. Re1 Re8 18. Ba4 b5 19. Bxb5 cxb5 20. Qxb5+ Bc6 21. Qd3
Black is up a piece, and he managed to win, although not without difficulty.
0-1
White: Denys Shmelov
Black: Edward Astrachan
I’d rather not tell how White has arrived at this position after only eleven moves. Suffice it to say that he is absolutely lost against an opponent rated 500 points below him. White’s king is stuck in the center, his pieces are poorly coordinated, and Black is about to open up the position and put White out of his misery.
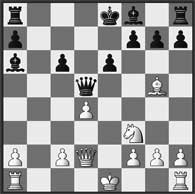
12. Kd1
White has correctly identified the safety of the king as his main priority. d1 is far from perfect but it’s the best White has in this position.
12...Rb8
A strong move. Black wants to play Rb8-b2, or Bf8-b4, forcing White to further weaken his position.
13. Qc3
Saves White from Rb8-b2...
13...Bd6
...and puts the pressure on Black to decide whether to play Bf8-b4 or not. 13...Bb4 14. Rb1 Bxc3 15. Rxb8+ Kd7 16. Rxh8 f6! leaves Black with a dominating position. Very often the winning side assumes that his advantage will play out itself, and fails to calculate forcing lines.
14. a3
White lives to fight another move.
14...O-O 15. Kc1 Rb6
Instead Black could have focused on carrying out c6-c5, which would have been the most dangerous plan. But the move in the game isn’t bad either — White is deprived of counterplay and won’t be able to fend off eventual intrusion on the b-file.
16. Be3
16. Rd1? Be2 17. Rd2 Bxf3 — White is deprived of his only useful move.
16...Rfb8 17. Re1 Bc4
Black has been playing very well up to this point, but here he starts going astray. This move threatens nothing and disrupts the coordination of the black pieces. 17...Rb3 merits attention; 18. cxb3 Rxb3 19. Qxb3 Qxb3 is hopeless, but 19. Qc2 allows the strong 19...Bd3.
18. Nd2 Ba2 19. Qd3 Rb2
19...Qa5 20. Rxa2 Rb1+ 21. Nxb1 Qxe1+ 22. Qd1 Rxb1+ would have been a worthy ending of this game, but White is not forced to take on a2 and could play 20. Kd1 instead.
20. Qc3 R2b5 21. Qd3 Ra5??
Black finally collapses under the pressure and blunders very badly. 21...Rb2 22. Qc3 Qb5 and Black’s advantage is indisputable.
22. c4 Bxa3+ 23. Qxa3 Rxa3 24. cxd5 cxd5 25. Kd1
And White converted his advantage.
1-0
White: Jay Bonin
Black: Denys Shmelov
[E18] Queen’s Indian Defense
1. d4 Nf6 2. c4 e6 3. Nf3 b6 4. g3 Bb7 5. Bg2 Be7 6. O-O O-O 7. Nc3 Na6
Black tries to avoid the drawish lines which arise after 7...Ne4 8. Nxe4. Ironically, he blunders almost right away and finds himself fighting for a draw the rest of the game.
8. d5 Bb4 9. Ne5 Bxc3 10. bxc3 exd5?
10...Nc5 defends the bishop on
b7 and ensures a reasonable game.
11. Bg5 Qe7 12. Ng4 Qe6 13. Nxf6+ gxf6 14. cxd5
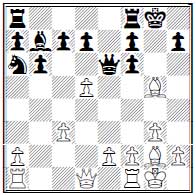
Now would be a good time to take stock of my position. My pawn structure is ruined, my pieces are poorly coordinated, my king is exposed, and my opponent has two bishops and a strong presence in the center. I am playing against an experienced international master, the game is played in a team competition, and the outcome of the match will likely hinge on the outcome of the game. Time to switch to defensive mode...
14...Qf5 15. Bh6
Happy with his position, White goes on a streak of mediocre moves. My rook wants to get to e8 anyway, whereas the white bishop would stand better on f4.
15... Rfe8 16. e4 Qg6 17. Be3
17. Bf4 still looks like a better choice.
17...Nc5
Now White has to give up his dark squared bishop, since 18. f3 could be answered by 18...f5. Black is still very much worse, but in a bad position like this every bit helps.
18. Bxc5 bxc5 19. Qa4 f5
Jumping on a chance to get rid of my doubled pawns, but...
20. Rab1
White finds a very strong move, forcing Black to part with material.
20...Ba6 21. exf5
To add to his woes, Black is now down a pawn.
21...Qd6 22. Qg4+
Happy with his position, White again goes on a streak of mediocre moves. The Black king would be safer on h8, so there was no need to force him there.
22...Kh8 23. c4
This pawn becomes a weakness in need of constant defense.
23...Re5 24. Rfe1 Rg8 25. Qh4 f6 26. Bf1 Bc8
26...Rxf5? 27. f4 strands a rook; instead Black just makes a waiting move.
27. f4
White has been playing without a clear plan for some time now; however, only now does he make a real mistake. In one move White weakens his king and sidelines his queen, giving Black chances for some counterplay.
27...Re7 28. Kf2
Now White goes astray, underestimating the dangers of having a weak king. After an accurate 28. Qh5 White will be able to bring his queen back, with good chances to convert his advantage.
28...Rge8 29. Qh6
Looks as if the best Black can do is trade rooks, but...
29... c6!
...makes White regret playing in such a daring manner. Now taking on c6 is obviously out of the question, and taking on e7 would most likely lead to perpetual check.
30. Bg2
If 30. dxc6?? Qd4+ and Black wins. 30. Rxe7 Qxe7 31. Rd1 Qe3+ 32. Kg2 Qe4+ 33. Kg1 Qe3+= (but not 33...Qxf5?? because of 34. Bd3+-).
30...Ba6 31. Bf1?
Better is 31. Red1 Bxc4 32. dxc6=
31...cxd5
31...Rxe1!
32. cxd5?
Again, White should avoid the exchange of rooks by playing 32. Red1 d4=/+
32...c4?
Black misses an opportunity to go into a favorable endgame with 32...Rxe1 33. Rxe1 Rxe1 where the poor position of the white queen leads to White’s eventual demise.
33. Rxe7 Qxe7 34. Rd1
White finally realizes that the best he can hope for is a draw, and attempts to coordinate his pieces.
34...Qe3+ 35. Kg2 Qe4+ 36. Kh3
White gives back his pawn but ensures the exchange of queens, leading to an approximately level endgame. After 36. Kg1 Black should take the draw with 36...Qe3+ since 36...Qxf5 gives White the advantage after 37. Bh3 Qg6.
36... Qxf5+ 37. Kh4 Qg6
The threat of Bf1-h3 forces Black to seek this exchange.
38. Qh5 Rc8 39. Bh3 Qxh5+ 40. Kxh5
With an eventual draw in the unclear endgame.
1/2-1/2
|