In his book Complete Endgame Course, Jeremy Silman recommends using the “flowchart mentality” to break a complex endgame down into a previously learned simpler position. Using this method, we can demonstrate a draw in a very complex position that occurred in the 2010 U.S. Chess League Championship between the New England Nor’Easters and the Miami Sharks.
The Basic Idea
In Basic Chess Endings, Reuben Fine examines bishops of opposite color endings where one side has two disconnected pawns against none:
“Here is the general rule which is applicable to all cases: If the Pawns are two or more files apart, they win; if they are only one file apart they draw. The reason is simple: if the Pawns are far apart, the Bishop must blockade one, while the King stops the other, so that the White King can support the Pawn held by the Bishop and win that piece…a rook Pawn and Bishop of the wrong color, of course are an exception to this rule, since the Bishop can be sacrificed for the other Pawn, when rook Pawn + Bishop draw.”
For the following position:
Fine writes, “Draw, since the Black Bishop stops the f-pawn and the Black King takes care of the apawn.” This will serve as our simple, previously learned position to which we will strive.
The More Complex Case
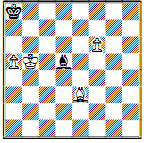
The following critical position appeared on Board 1 of the 2010 U.S. Chess League Championship, IM Shankland vs. GM Becerra. Please refer to the USCL website (http://www.uschessleague.com/games/shanklandbecerra10finals.htm) for the full game score.
Shankland-Becerra, US Chess League: NE vs. MIA
Black to move
The path towards equality starts with Black simplifying White’s kingside to the “wrong rook” h-pawn.
43…gxh3 44.gxh3
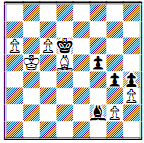
To see why this will work, consider the following “fantasy” position in the context of Fine’s theoretical draw. If we can achieve this position, the game will be a draw.
White to move
From Diagram 3, White has one major idea to try for a win. White will sacrifice his a-pawn in order to win the Black h-pawn: 1.a7 Bxa7 2.Kxh4 Bb8 3.Kg5 Ke7 4.h4 Kf8 and Black’s King reaches the corner with Reuben Fine’s draw. If 4.Kg6 (with the idea of 4...Kf8? 5. Bd5), Black can freeze the h pawn with 4…Bg3. Since 5. Kg7 Bh4 6. Bf5 Kd6 7. Be4 Ke7 doesn’t lead anywhere, White’s last attempt to make progress is with 5.Bf5 (with the idea 6. h4 Bxh4 7. c7), but this is easily met by 5…Kf8 when White cannot make progress: either the Black King reaches the h8 corner or 6. Kh7 Ke7 is not productive for White. For example, trying to force matters with 7.h4? loses a pawn to 7…Kd6.
Additionally, from Diagram 3, White can try to reposition his pieces to “optimal” squares, but this also will fall short. For example, 1. Bf3 Ke7 2. Bg4 Kd6 3. Bd7 Ke7 4. a7 Bxa7 5. Kxh4 Bb6 6. Kg5 Kf7 7. h4 Kg7 also leads to the drawing position described by Fine. One tricky try for White is to deploy the White Bishop to b5: 1. Bf3 Ke7 2. Be2 Kd6 3. Bb5 when Black must play 3…Kc7 (White was threatening c7 should Black move his King back to e7). Now 4. a7 Bxa7 5. Kxh4 Kd6 6. Kg4 Bb6 (this is the only move-- if 6...Bb8?? 7.Kf5 and Black gets boxed out.) 7. h4 (or 7.Kf5 Bd8 covering the c7 and h4 squares in the nick of time) Ke7 8. Kg5 Kf7 9. Kh6 Kg8 and Black has made it to Fine’s draw.
From this analysis, we conclude that if Black can get to the fantasy position, the game is a draw. In fact, if Black can achieve ANY of these positions, the game is a draw.
Getting to the ‘Fantasy’ Drawing Position
As long as Black maintains a blockade of the dark a7, c7, and h4 squares, the “wrong rook pawn” assures a draw. Black will aim for our theoretically drawn positions.
44…Kc7 45.Be6
As we can see from our fantasy position above, the Black f5 pawn does not play a role in this position, and, if moved to the f4 square, can even actively hinder Black’s dark squared Bishop . Therefore, Black can happily sacrifice this pawn in order to set up a blockade of the dark squares. White’s alternative was 45.Kc4 Ba7 (45…Kb6?? 46.a7) 46.Kb5 (46.Kd3 Kb6) 46…Kb8 with no progress.
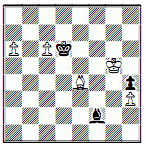
45…Ba7 46.Bxf5 Bb8 47.Bd3 Ba7 48.Be2 Bb8

White to move
Black has now established a blockade on the critical squares. Black will continue hopping the Bishop back and forth if White continues to maneuver his Bishop around.
49.Kc5 Ba7+ 50.Kd5 Bf2 (for 50…Kb6!?, see below) 51.Bb5 Ba7 52.Ke5 Bb6 53.Kf5 Bf2 54.Kg5 Kd6 and Black has achieved a line from our fantasy drawing positions. It is clear from this straightforward play that White can’t stop the creation of the ‘fantasy’ drawing position, and therefore the complex position must be a draw as well.
An Intriguing Detour to a Draw
For a complete assessment, let us now examine an interesting line that demonstrates the solidity of Black’s position. It turns out Black can go astray and still draw this position.
From our main line, what if Black tries to force the issue with 50…Kb6!? Black's play seems contradictory to the idea of keeping his King ready to head for the h8 corner, but he is relying on another 'building block draw' involving a Black square blockade. 51.Kd6 Black need not be concerned with 51.Bg4 followed by Bc8 and Bb7 as the Bishop will be too vulnerable to the Black King from there to assist with the advance of his pawns. 51…Bb8+ 52.Kd7 Bg3
We have now reached a critical point, where Black looks to be in serious trouble. However, despite advanced pawns, White lacks control over not only the dark a7 and c7 squares, but also the light b7 square! This is exemplified in the following variations:
1) 53.Bb5 Bb8 54.Ke6 Bg3 55.Kf5 Bb8 56.Kg4 Bg3 =
2) 53.Ke6?? Kxc6 54.a7 Kb7 and the draw is assured.
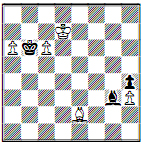
White’s last attempt to win, then, involves trading the two passed pawns for the Black Bishop and then grabbing the h-pawn. However, this brings us to the final factor of this incredible position: the black h-pawn is so far advanced that White does not have enough time to both capture this pawn and keep the Black King out of h8.
53.a7 Kxa7 54.c7 Bxc7 55.Kxc7 Ka8.
White can try to box out Black’s King from coming to h8, but will fall short by one tempo. For example, 56.Ba6 Ka7 57.Bc8 Ka8 58.Bg4 Ka7 59.Bf3 Ka6 60.Kc6 Ka7 (Not 60...Ka5?? leading to mate in 45 moves! 61.Be2 Kb4 etc.) 61.Kd6 Kb8 62.Bc6 Kc8 63.Ke7 Kc7 64.Bd7 Kb6 65.Kd6 Ka7 66.Bg4 Kb6 67.Bf3 Ka7 68.Ke5 Kb8 69.Kf4 Kc7 70.Kg4 Kd6 71.Kxh4 Ke7 72.Kg5 Kf8 73.Kh6 Kg8 =
Amazing! Black has just enough time to reach the h8 square from the a-file. Even when Black gives White a lot of play, trading down to the wrong rook pawn already saved the day. |